Showing posts with label redo. Show all posts

Tuesday, September 24, 2013

Thrift Store Chairs Makeover

Back when I discovered the 'five dollar filing cabinet' I also stumbled upon a pair of chairs.

When I first laid eyes on them they yelled at me from across the room. "Save us!! Unleash our wild side. Let our inner animal roar!"

 They were telling me to paint them turquoise and upholster them in either leopard or zebra print. I rescued them from the thrift store and took them home to do just that. Never mind what to do with them when they were finished. Perhaps I would give them away to a family member or sell them. Their inner animal just won't blend with the look I'm going for in the house. Either way, I simply couldn't let the chairs spend any more time living in a thrift store being drab yellow with maroon seats.


I brought them home and Mr. B asked me if they were for the dining room.
Well honey, you see the thing is. I bought them to unleash their potential, in the form of turquoise and animal print.
 That statement earned me the look. The one that says "Your buying things to redo that aren't even for the house when you have a ga-gillion other projects on your plate."

Umm maybe....

I did think about it for a while. (Don't tell him but, there might of been a shred of truth in what he said, or rather what the look said.) I stuck them in the dining room at the head and the foot of the most awesome-est table ever, you know the one my amazing husband built for me. They didn't look bad. Over the next few days they kinda grew on me being in there. Eventually I came to the decision they would be white with green or tan seat covers. Don't get me wrong they still would look great in the original color scheme, but I was beginning to see a tamer version would be OK too. 

This Sunday, while I was boiling down pizza sauce and Mr. B was watching football, I was able to find some time to get out side to do some painting. We busted out the stable gun for some upholstery. 


I am thrilled with the way they turned out; as I am with most of my makeover projects. There is just something about seeing a piece of furniture transform, going from drab to fab.

The nitty gritty:

Three coats of Rustolium spray paint in Navajo White, gloss.
(no I didn't sand first)
Two clear coats. 
The fabric was left over upholstery fabric from another project. I believe it is from Joanne's.


Let's do a side-by-side, shall we.


I'm still itching to redo a chair with animal print.
Perhaps someday another chair or two will call out to me.


Wednesday, September 18, 2013

Sewing Room Hutch


Last month I bought this hutch off of Craigslist. After weeks of searching for the perfect piece in the right size and most importantly in the right price range. Mr. B was kind enough to drive me to go pick it up and help me load it in the pick up.

It originally had glass doors; one of which was broken. Those came off right when we got home. Mr. B is always quick when it comes to taking something apart, so alas there are no pictures of the hutch in all it's original glory.


I gave light sanding, I mean very light. I'm not big on striping furniture here; just a quick buzz over the large surfaces to give the paint something to stick to. I used my favorite primer for furniture, Zinzer Oil based. Then three coats of soft white in a semi-gloss.  

I decided to keep the original hard ware.  I just took it off when I painted and then put it back on, I didn't try and clean it or shine it up at at. I love the way it looks on the white, it really stands out.


This has to be my favorite piece in the crafty room. My fabric stash offers some color to the room. My notions, which are mainly from Mr. B's Grandma, are displayed in old canning jars from my Grandma.

On top of the hutch I was able to display more notions and a book from the Grandmas, not to mention the button-holer (which I have yet to try and I'm sure it will be an adventure)


I'm surrounded by bits and pieces of all the ladies who have inspired and encouraged my craftiness and love of sewing. That gives me the warm fuzzies.


Sunday, August 25, 2013

Project Five Dollar File Cabinet

I stopped by a thrift store last week, just to look. Well I had to go back later that weekend with the truck to bring home the load of goodies that were on hold for me, you see they wouldn't fit in the MINI. I found this beauty. Yeah she's a little rough around the edges, but she's heavy duty, all the drawers work, and the hard wear has great character. For five dollars I couldn't pass her up. I've been on the hunt for a file cabinet for the sewing room/home office for a while. The plastic tote we have just isn't cutting it any more. Four drawers might be a tad over kill for our paperwork, but I'm sure I will be able to fill the remaining drawers up with crafty stuff. 


I had planned to take off the hardware before I painted her. I didn't notice until we got it home that they were riveted on. So it was on to plan B, very carefully tape around every thing. I got excited and started taping before I managed to take the before picture.

I wanted to go with a deep rich color to bring out the hardware on the drawers. Since I'm not a hunter green or maroon person I settled on navy blue. 


Five cans of spray paint later, she looks great. The cabinet adds a pop of color to my new sewing room, more details and a full reveal on that coming later this week. 


Thursday, April 4, 2013

We did it ourselves and I'm so proud of us

A few weeks ago we refinished the floor in the future crafty room. We were so pleased with the way it turned out that we decided to do our dining room and living room floors as well. We decided to do them both in one long weekend. Get it over and done with, only have to clean up the dust once.
We moved all of the furniture into the crafty room and sealed the door as well as we could to keep the dust out.
Like the crafty room these were the original floor boards, mainly unfinished with a painted boarder. These rooms had a much larger painted boarder, which meant more intense sanding.


 But before we got to that part we had to fix a few boards. Wes started at that while I ran to the hardware store to rent the sanders. I came home and he is trying to rig something up to hold a board steady while the glue dried. He was using my hand weights, string, and a screw hook.  He gave me that look when I asked him what he was doing. You know the this would be a hole lot easier if you just let me buy the expensive quick clamps that I wanted so this is all your fault and I'm going to by pissy for the rest of the day look. He forgot that I had some clamps hiding upstairs in my sewing room for the quilting frame. I felt really good being able to save the day. BTW: quick clamps have been added to the pick-up-at-the-home-improvement-store-when-we-have-some-extra-cash list. To avoid future looks while trying to glue the floor back together.


After the boards were fixed and most of the nails set, it was time for the sanding.

It took allot to get all that paint up off the floor.


Fourteen hours of sanding. Fourteen hours of back and forth with the drum sander and squatting down with the edger. I found that I couldn't kneel and do it so I had to be in a half squat. My poor tush and legs were so sore the next day.
And my back and my arms and my abs...


We did about an hour break in there. The edging sander took a poop. Turned it off to change out the paper and it wouldn’t turn back on. Off to the hardware store we went. I was crossing my fingers and toes that it could be fixed. They only had one at that store and the one at their other location was rented out for the weekend. I wanted this project to be done this weekend. I would probably would have gone into melt-down mode if they weren't able to get it up and running.

Before we went the boys took it apart, cleaned it, and did some trouble shooting. They thought it might be the switch. At the hardware store Mr. B changed it out and it started right up.  The clerk was busy with other customers so he set up Mr. B with the tools and the new part and let him go at it. It’s times like these that I’m so glad I married a handy man!


The next morning we drug our tired, sore asses out of bed and finished cleaning up the dust on the floor.

Then it was time for the polyurethane. Two coats on Saturday. Then we were off to my parents to escape the toxic fumes and celebrate Easter. Man does that stuff stink. Mr. B swears he was getting high off the fumes by the time we left.


Unfortunately two coats wasn't enough. When we got home there was some blotchy spots and bubbles. I cried. More work, more time that our house was turned upside down. I pulled it together and we sanded and ran to Menard's that night. The next morning we put a third coat of poly on the floor before we went into work. Poor Gus was confined to the mud room and didn't get any good naps in. He told me that he needs to sleep on the ottoman or the bed. He's an old man and the floors aren't comfortable.

The floors do look nice. I am glad that we did the extra work and put the third coat on.


Tonight we finally get to put our furniture back! Mr. B did hook up the TV in our room, so the past few nights we've had movie nights in bed. It's a nice treat but I'm ready for things to go back to normal.


Tuesday, March 12, 2013

Floor Refinish

Before we even moved into the house we tore up all the carpeting in the down stairs. The old shag carpet that was well worn. Well past it's prime. So past it's prime there were definite worn areas from the previous owners paths around their furniture. Like the carpeting upstairs it had a distinct odor of cats and old people. When we tore it up the floor underneath was the four inch pine boards. We decided then and there that we were going to try and have them refinished rather than cover them up. We knew that they would be beautiful when finished, or at least that's what we kept telling ourselves. The boards were unfinished and dirty and scratched and there were gouges and imperfections, not to mention the two foot border of paint around the edge of each room. Did you know that back in the day people would paint the edges of the floor and put a large area rug in the middle of the room. I think I told you that before. We have lived with unfinished floors for over two years now. 


We kept going back and forth. Do we try it ourselves or do we shell out the money for someone to do it for us. Back and forth for two years. Then we thought let's try it in one room and see how it goes. We would try it in what is going to be the office and crafty room, perfect area for our expirament, if it didn't go well it wasn't a common space like the dining room or living room. We kept he-hawing around as to when we would give it a go. I made an executive decision. I took last Friday off put on my big  girl pants and rented the sanders. I recruited Mr. B's brother for a pair of extra hands. No turning back. 


We sanded for most of the day on Friday. I do mean we this time. I helped, pushing the big drum sander back and forth across the floor to smooth them out and remove some of the blemishes. It was like mowing the lawn, back and forth back and forth, slow and steady in nice straight lines. Another day of applying the polyurethane  Well two days. We put two coats on let them dry, and they weren't smooth. The next day I buzzed over the floor with 220, really fine, sand paper on the orbital sander and we put a third coat on. Perfection this time. 

Come, let me show you how it looks now.


Side note: Mr. B and I used this room as our bedroom for two years while we waited to work on the master suite. It never had a door. We never put one on. For the life of me I don't know why. We bought one this weekend and Mr. B had it installed in an hour. It took me a few more to get it painted. What were we thinking. All those fights were I just wanted to run to the room and slam the door in anger. Those days where people came to the house and could see into our room. Really, could we have been that stupid!

Let's not dwell on that. We are not here to figure out the logic in our thinking, but to admire our handy work. 


Look at that beautiful floor. 

We couldn't be happier with the way it turned out. There are still some imperfections and stains in the wood. You can see where they are nailed down, in one place some one went a tad over board with the nails; must have been a squeekie floor board. The weathered look adds to the farmhouse feel we were going for.

It was alot of work but well worth it. And we saved a chunk of change doing it. We are so happy with our refinishing abilities I have already taken another Friday off at the end of the month for us to do the other two rooms.  

One more look. Let's do a side by side comparison. 


Tuesday, October 30, 2012

New to Us Dressers

Remember when I showed you this. I told you I would finish them in the next six months.


I beat my deadline!! They're done. Told you we have been busy.
 I took two beat up dressers found on Craig's list. ($100 for a matching pair of solid wood dressers, you can't beat that)They when from looking like this.


With a little paint and some TLC they now look like this.


And this. 
Remember matching pair. 


Mr. B installed new drawer slides on all thirteen drawers. The existing ones were a tad beat up. They slide much better now. 
(He used the heavy duty ones for kitchen cupboards.) 

Rather than buying all new hardware we just updated the existing brass looking ones. Spray paint. Much classier in the dark brown. 


They now reside in the master suite, full reveal coming soon I promise. For the first time since he was eight, Mr. B has a dresser for his clothes.
Crazy, I know, but we aren't going there, 

Thursday, October 18, 2012

Mud Room Progress Part II

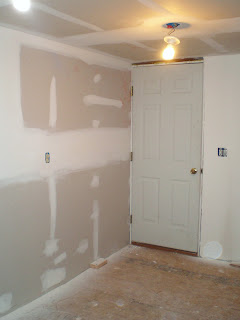
Just wanted to give you an update on the mudroom. Remember how Mr. B had drywalled and put down the sub floor a few weeks ago. The plan was for my to do the mudding myself, I even borrowed the proper tools and got a crash course from a friend who used to do it professionally. Well the room sat for a while with nothing being done. We have been busy working on the "master suite". (The big reveal is coming soon I promise.) Any way we have been working on a gazillion other projects around the house and the mudding got pushed to the back burner.

Two weeks ago Mr. B suggested that we just give in on this one and hire someone to do it. It would save us time and it would save my sanity. Seriously, there is always so much to do around here and too little time! I called around and found someone who could do it without braking the bank.


I think it turned out wonderfully. I do feel a tad guilty for not doing it myself but it was so liberating to come home last night and have it done. Now all I have to do is find time to prime and paint the walls and lay the flooring. And get Mr. B to put up the trim and baseboards and make me a storage bench and hang coat hooks and get a work bench..you know the easy stuff!

For now let's just relish in the fact that it is mudded and looking great.

Thursday, September 6, 2012

Then and Now

I was going through the photos and came across this. 
Our bathroom when we first moved in. 


Yes that is really carpeting, no shower, and one very blue bathroom, tube included. 

This is our bathroom now. 


It's still blue, but a less intense blue. We now have a shower and there is no carpeting.

Much better. 


Monday, September 3, 2012

Mud Room Progress

This year the big project around the Acres has been gutting and redoing the room off the back of the kitchen. We want to turn this space into a "mudroom". The main entrance to the house. A place to take off coats and shoes and some extra storage. 

When we started this spring it looked like this. 


The room was not insulated. Because it wasn't insulated it would freeze up in the winter and thaw, then freeze again, then thaw. There was allot of moisture in the room. We had a slight mold problem. See the right hand side of the picture, that's not a bad paint job, that would be mold. Yup it had to go. 

So at the beginning of the spring it was all torn out. The moldy fiber board the crappy "wood" linoleum flooring. It all went bye-bye. It sat empty for a few months. Nothing but the sub floor and the studs. 

A few weeks ago my parents came down and helped with the wiring. Since then Mr. B has been quite the handy man.  

He insulated and installed the vapor barrier.


His brother came over and helped hang dry wall. 


He laid plywood over the floor to create an even surface for new flooring. 


I think he made some major progress these past two weeks. 
He also wore a tool belt. 

Thursday, August 23, 2012

We Have Lights and Power

While mom and I were ripping out carpeting this past weekend, the boy played with the electricity in the mud room. We know have lights on a switch! The one in the mud room was on a pull chain. Now we have two lights on that we can flip on with a switch. 


We also have a light on the porch, on a switch. Moving up in the world. We opted for a halogen security light. Most of the stuff at the home improvement store was the "rubbed oil bronze" color. I love it but it doesn't go with the white and black exterior of the house.  The ones that would go with house were limited, and not so nice. And with the security light we have a better and brighter view of the yard, easier to spot the predators that might come after the birds. 


The boys also installed three of these. 


We didn't have any outlets in the mud room before, unless you count the one on the light fixture. That we never used. They also put an outlet on the porch. Most exciting part of the whole adventure. We no longer have to run an extension cord from the kitchen if we want to use power tools outside. 

Tuesday, August 21, 2012

Bye Bye Old Smelly Carpet

My parents come over on Sunday morning with their friend Jeff. The boys played with electricity and rewired the mudroom, post on this to come soon! While they were doing this my mother and I tore up carpeting. It seems that we have been doing allot of that lately, last time it was the stairs and hallway.  

Two of the bedrooms, what will be the master bedroom and sun room, still had carpet. Old carpet. Carpet that had a slight odor of old people and cat. It needed to go.


Once we got all the stuff moved out of these spaces the rippin' and a tearin' went rather quick. It seems like we just shuffle all of our crap from room to room upstairs. Because we are in the process of redoing the house most of our stuff still has to find permanent homes. It doesn't seem like we have that much crap until you have to move it, for the fourth time.  


That black stuff is just loose pad from the carpeting that needs to swept up. We will give the floors a good cleaning and like the hallway and library we will simply paint these floors white.
My goal is to have everything painted (walls, floors, ceilings, doors, and trim) By the end of the month. That gives me two weeks. We shall see how this goes.


Friday, August 17, 2012

Sneak Peak

I'm painting furniture again. The TV stand turned out so awesome that I thought I would give it another go. More dressers, this time for clothes not movies. 


I started this project oh, about three weeks ago. Still not done..Life happened. You know vacation, it started to rain again so the grass needs mowing, work, and the never ending battle to try and keep the house clean. But its getting there. The big reveal is to come soon. You know like the in the next six months.


As a side note: If you are going to paint furniture on your back porch wear sunscreen. Or just do it topless. A tube top would work too, but where's the fun in that. 

Monday, August 13, 2012

Updated Porch Posts and Tool Belts

After our extra long weekend of family togetherness it was back to work for me on Wednesday. Mr. B, on the other hand had the rest of the week off. The whole shop had Friday off, and "Maggie it doesn't make any sense to go in for two days." 

WHAT!! 

 He assured me that he would do something productive around the house, not sit on his bum playing video games. OK. We shall see, track record in that area isn't superb. 

He blew the record out of the water. He was a super amazing DIYer and handy man while I was at work. I came home on Thursday to Mr. B putting the finishing touches on our new porch posts. He was wearing a tool belt. My heart goes pitter-patter when Mr. B has on a tool belt, not that you needed to know that.

I'll just stop now and let you admire his handy work with I think about my handy man.


Gus Gus was playing Vanna White while I was snapping the photos.
(Look how green the grass is!! We have been getting rain.) 

Because Mr. B was just about finished by the time I got home I was unable to take any before photos for you. You needed to see how crooked one of the posts was. Mr. B said it was like a drunk farmer installed it. I did get these so you could see how bad the old ones were.


They were so rotted out on the bottom that they were swaying in the breeze. They weren't great last summer and when down hill rather quickly last fall and winter. I think there were bugs eating at the wood and Patty and Bernie pecked at the wood trying to get at the bugs. In the process doing a number on the layers of paint.


Luckily they are mainly for decorations. If we got a really heavy snow I'm sure they would do some support work for the overhang. The old posts were the fancy pants turned posts. We opted to go with straight 4x4s. We thought the nice clean lines would look good with the farmhouse. That and they were much easier on the budget. Since we went with the treated we will hopefully deter any bugs and rot for a while. I will just have to wait till next spring to paint. Zebra stripes would be awesome! Wonder what Mr. B would think of that...


He did put the thermometer back up, what country porch is complete without a thermometer?


Monday, July 16, 2012

dresser redo

 When Mr. B first bought the flat screen TV back when we first started dating he bought a TV stand like this for it.
3-in-1 TV Stand with Rich Solid Wood Finish - 42"
When we moved in together it work well in our apartment.

Then we bought the house. And for the past two years it has been getting to me. It just doesn't go well in the old house. It is too modern, and the black glass is a dust magnet. Not to mention there is no good way to hide all the cords from the TV and all the game consuls. And a mess of cords makes a great Gus-Bunnie trap. I went widow shopping for something new, but everything that was sturdy (not made of particle board and would start to sag in a year) and we liked was over our budget.

Enter Pinterest. I kept seeing the awesome media centers/TV stands that people made from an old dresser. Several months ago I began my hunt for the perfect old dresser. Not to big/not to small. Three drawers. Not very wide, it needs to fit between two window. And cheap. That was the hard part. I could find some amazing dressers but over $75. Oh hell no, this was supposed to be a el chepo project. Then I went shopping in my mothers basement. She had bought an inexpensive one from the Habitat Restore a few years ago for my sister to use at college. It can't get much cheaper that FREE-NINETY-NINE!


A shelf were the top drawer was some paint and new hardware and we have an awesome media center for under $30!


The cords are hidden, it isn't a dust magnet, and I have a place to store all the DVDs and games. Not to mention the pop of cheery color. The picture doesn't do it justice. It is a nice rusty red/orange color "rum raisin"

I splurged on the hardware. $4 a piece, but when you get the dresser for free you can. Besides they really pull it together.


Don't tell anyone, but I painted wood laminate. Yup that's right. Laminate. The key is the primer. I used an oil based primer and I scuff it up with the sander first. One coat of primer and two coats of semigloss paint.