Showing posts with label paint. Show all posts

Tuesday, September 24, 2013

Thrift Store Chairs Makeover

Back when I discovered the 'five dollar filing cabinet' I also stumbled upon a pair of chairs.

When I first laid eyes on them they yelled at me from across the room. "Save us!! Unleash our wild side. Let our inner animal roar!"

 They were telling me to paint them turquoise and upholster them in either leopard or zebra print. I rescued them from the thrift store and took them home to do just that. Never mind what to do with them when they were finished. Perhaps I would give them away to a family member or sell them. Their inner animal just won't blend with the look I'm going for in the house. Either way, I simply couldn't let the chairs spend any more time living in a thrift store being drab yellow with maroon seats.


I brought them home and Mr. B asked me if they were for the dining room.
Well honey, you see the thing is. I bought them to unleash their potential, in the form of turquoise and animal print.
 That statement earned me the look. The one that says "Your buying things to redo that aren't even for the house when you have a ga-gillion other projects on your plate."

Umm maybe....

I did think about it for a while. (Don't tell him but, there might of been a shred of truth in what he said, or rather what the look said.) I stuck them in the dining room at the head and the foot of the most awesome-est table ever, you know the one my amazing husband built for me. They didn't look bad. Over the next few days they kinda grew on me being in there. Eventually I came to the decision they would be white with green or tan seat covers. Don't get me wrong they still would look great in the original color scheme, but I was beginning to see a tamer version would be OK too. 

This Sunday, while I was boiling down pizza sauce and Mr. B was watching football, I was able to find some time to get out side to do some painting. We busted out the stable gun for some upholstery. 


I am thrilled with the way they turned out; as I am with most of my makeover projects. There is just something about seeing a piece of furniture transform, going from drab to fab.

The nitty gritty:

Three coats of Rustolium spray paint in Navajo White, gloss.
(no I didn't sand first)
Two clear coats. 
The fabric was left over upholstery fabric from another project. I believe it is from Joanne's.


Let's do a side-by-side, shall we.


I'm still itching to redo a chair with animal print.
Perhaps someday another chair or two will call out to me.


Thursday, August 15, 2013

Island Reveal


It is the perfect opportunity to share the kitchen island with you, seeing as it has only been done since early July. But now the stars and moon are in the proper alignment for sharing pictures. More accurately my kitchen was relatively clean, the floor wasn't full of muddy Gus prints, and it was still somewhat light in there.


We picked up two of the el-cheapo wood stools from Menards. A can of red spray paint and ta-dah!


Mr B was thoughtful enough to use wood glue during the assembly for extra durability, I don't think these guys are going to get wobbly any time soon.


Wednesday, March 6, 2013

Painted Trim and Curtains

Over the weekend Mr. B had to work, so I dug out my painting close and went to work on the trim. We finished scraping paint and sanding the weekend before and over the week we finished prepping for paint. We puttied the holes and calked along the seams. I started priming Friday night and was able to finish up with the touch-ups on Sunday afternoon.

I was going to wait for Mr. B to get home to help me hang the curtains. You see the week before I had tried to hang the curtains in the dining room, but there was an incident with the plaster. I was drilling a pilot hole before I put the screw in. It didn't want to go, so I applied more force. Well all of a sudden it went and I put the drill into the wall creating a large-ish hole in the plaster next to the window. We filled that hole and I touched up the paint this weekend. You can't even tell it happened. Sorry I "forgot" to take pictures of it. Taking pictures would leave evidence and the world would know. I suppose telling you does the same thing.

Like I said I was going to wait for him to get home to help me, but like most things I got impatient and decided to try it again. Success this time. I got a system down. Now drilling pilot holes, just start it by pounding in a nail. If it didn't hit a stud I put in one of the plastic dry wall support thingies. (I'm sure they have a proper name, but it escaping me right now.) I got every one right on the first time. The curtains are hung and the curtain rods are level. 

I suppose you want to see what they look like. I'm still trying to figure out the best way to take pictures of windows/window treatments and get the lighting right. There is probably a tutorial somewhere out there about it. I'll look for it when I invest in a nicer camera. Not much I can do with our old pocket size point and shoot model.


I can't believe it took me over two years to get this done. We spend so much time in this room, now that they are done I realize the globy green paint was bringing me down. The white trim makes the details on the woodwork stand out and compliments the tan walls in a way green could never do. 


We both agreed that it makes our living room cozier and more inviting. The sun blared through the windows most of the morning and afternoon. The new curtains still let in the light but defuse it. It's not as intense any more. 


Just in case you were wondering the curtains are from Target and the curtain rods are, get this, from none other than Wal-Mart. Would you believe that out of the big box department stores the Mart has the largest selection of curtain rods, and the most reasonable prices.

Guillermo update:
He is still limping no major improvement. Which isn't great but it's better than it getting worse. It is still painful, but seems less so. He's limping with more speed and seems surer on his feet. He is also back at sassing the dog, a good sign. 


Friday, February 1, 2013

Scrapping Paint

We started a new house project last week. A boring, tedious, house project. But one that needs to get done. We are scrapping all the layers of old paint off the trim on our living room windows. There are ALOT of layers of paint on those. Several layers of the nasty green that covered most of the house, then brown, then turquoise, then white, then finally the bare wood.It was gobbed on to almost a half inch tick in some places. Yikes! With all that paint on the trim we were starting to loose some of the details in the molding.


We have been using a heat gun to remove most of the paint. It doesn't smell the best but works much better that trying to scrape it off unassisted or using harsh chemicals. Heat it up just so the paint starts to bubble and it comes off so easily. But don't heat it up to much or you scorch the wood. (we did do this in several places, shhhh you won't be able to tell once it is painted) From there we will fill in some of the old nail holes, sand them smooth, and prime and repaint.


I say we, but in all honesty it's been mainly Mr. B scrapping away. But to be fair I have made dinner and cleaned the kitchen every time he worked at it. And I will be the one doing all the painting. Mr. B only does the roller, no edging or trim.


Tuesday, October 16, 2012

How to Paint a Wood Floor

I have been painting the wood floors here at the acres. We decided to go with paint for several reasons. It brightens the room. It is easy to clean, the Gus bunnies gather into the corners and are easy to ketch with the vacuum and is easy to scrub and wipe up. Unlike carpeting it doesn't hold smells and doesn't stain easily. If it starts to look dingy simply repaint. We also feel that it stays true to the farmhouse look that we are going for. When we tore up the carpet there was already paint on the floor. People used to paint the edges of the floor and put a rug in the middle. Look in some of your trendy furniture catalogs, you will notice painted floors. Thanks mom for pointing that out! (she was hesitant two years ago when I told her my plan, she has since converted)

So how does one go about painting a floor? It isn't that hard. I'm sure there are several ways to go about doing it. This is just how we do it around here and what works for us.

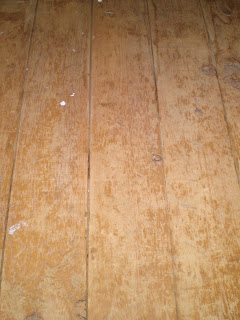
First you need to make sure your floor is clean. You don't want to skimp on the prep work. Like any project it will make for a better finished product. Tap down any nails and pull up any staples. Sand the really rough spots and as it was in our case any glue off the floor.  Vacuum up all the dust and then wipe down the floor to get any dirt and dust that remains. You don't want your roller picking any of that up. We have five inch pine boards for flooring, so before we vacuumed we took a screw driver and scrapped the 100 years of dust and dirt that was packed in the cracks between them.

We end up with something like this.


Now that the floor is clean it's time to prime. I am a strong believer in priming. We have found that it works best to use an oil based primer, I like Zinsser 123 oil based. Oil based is the best at sealing the wood and locking in stains. We tried water based on one of our floors and had some stains bleed through. It looked like I split coffee all over the floor. We went over it again with oil based no stains came through with that. After that mishap we have used oil base and haven't had anything bleed through with one. 


As with painting any wall I edge it in with a paintbrush. I go along the baseboard with an angled brush and pull the paint in towards the center a few inches. Mr. B use a roller to paint the rest. (That's team work) Let the primer dry for at least three hours, overnight is the best. 

Then it's time to paint. Use a paint that is made specifically for floors. You don't want to use regular old wall paint. You will be walking on this, and you want to use something that will hold up to the heavy traffic and beating that a floor takes. I like Behr porch and floor paint. The friendly people and your paint store should be able to tint it to whatever color you like. I use a shade of whit on all my floors. I have also used a dark brown on my stair.


Just like the primer edge in around the baseboard with a paint brush and use a roller on the rest. You will want to do at least two coats. Remember you will be walking on this. You might need more depending on the color you use. I think I did three or four coats on the stairs with the dark brown. So when you are done you end up with something looking like this.


Some people put a coat of varnish on top of the paint. I opted out of this. I think it would make the floor to shinny(slippery) and it would show the scratch marks from someone's claws. 
(Mr. Gus) Like I said if it starts to look nasty and beat up, we can always freshen it up with a new coat. Our bathroom has been painted for two years, and we haven't had to do that yet. 

To recap you prep by sanding problem areas and give your floor a good cleaning. Give it one coat of oil base primer and two coats of paint. The whole process will take a weekend. After doing four rooms my only regret it that I wish I would have invested in a pair of knee pads.