Showing posts with label floors. Show all posts

Wednesday, August 14, 2013

Quarter Round

Sunday Mr. B set up shop in my fingers-crossed-soon-to-be sewing room. He started cutting all the pieces to put the finishing touches on the trim. 


After we refinished the floors we decided to install quarter round in all the rooms. I like the finished look it gives to the trim. And, as a bonus, it hides all the imperfections in the finish along the walls. 


He's been plugging away at it all week. We just need to caulk and putty, then I can paint. I splurged the extra fifty cents per board and got the primed stuff. We should have this room done by the weekend. Then on to the dining and living rooms. 

Thursday, April 4, 2013

We did it ourselves and I'm so proud of us

A few weeks ago we refinished the floor in the future crafty room. We were so pleased with the way it turned out that we decided to do our dining room and living room floors as well. We decided to do them both in one long weekend. Get it over and done with, only have to clean up the dust once.
We moved all of the furniture into the crafty room and sealed the door as well as we could to keep the dust out.
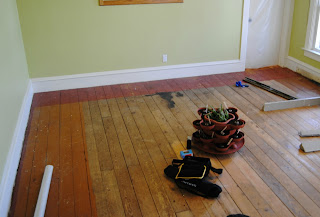
Like the crafty room these were the original floor boards, mainly unfinished with a painted boarder. These rooms had a much larger painted boarder, which meant more intense sanding.


 But before we got to that part we had to fix a few boards. Wes started at that while I ran to the hardware store to rent the sanders. I came home and he is trying to rig something up to hold a board steady while the glue dried. He was using my hand weights, string, and a screw hook.  He gave me that look when I asked him what he was doing. You know the this would be a hole lot easier if you just let me buy the expensive quick clamps that I wanted so this is all your fault and I'm going to by pissy for the rest of the day look. He forgot that I had some clamps hiding upstairs in my sewing room for the quilting frame. I felt really good being able to save the day. BTW: quick clamps have been added to the pick-up-at-the-home-improvement-store-when-we-have-some-extra-cash list. To avoid future looks while trying to glue the floor back together.


After the boards were fixed and most of the nails set, it was time for the sanding.

It took allot to get all that paint up off the floor.


Fourteen hours of sanding. Fourteen hours of back and forth with the drum sander and squatting down with the edger. I found that I couldn't kneel and do it so I had to be in a half squat. My poor tush and legs were so sore the next day.
And my back and my arms and my abs...


We did about an hour break in there. The edging sander took a poop. Turned it off to change out the paper and it wouldn’t turn back on. Off to the hardware store we went. I was crossing my fingers and toes that it could be fixed. They only had one at that store and the one at their other location was rented out for the weekend. I wanted this project to be done this weekend. I would probably would have gone into melt-down mode if they weren't able to get it up and running.

Before we went the boys took it apart, cleaned it, and did some trouble shooting. They thought it might be the switch. At the hardware store Mr. B changed it out and it started right up.  The clerk was busy with other customers so he set up Mr. B with the tools and the new part and let him go at it. It’s times like these that I’m so glad I married a handy man!


The next morning we drug our tired, sore asses out of bed and finished cleaning up the dust on the floor.

Then it was time for the polyurethane. Two coats on Saturday. Then we were off to my parents to escape the toxic fumes and celebrate Easter. Man does that stuff stink. Mr. B swears he was getting high off the fumes by the time we left.


Unfortunately two coats wasn't enough. When we got home there was some blotchy spots and bubbles. I cried. More work, more time that our house was turned upside down. I pulled it together and we sanded and ran to Menard's that night. The next morning we put a third coat of poly on the floor before we went into work. Poor Gus was confined to the mud room and didn't get any good naps in. He told me that he needs to sleep on the ottoman or the bed. He's an old man and the floors aren't comfortable.

The floors do look nice. I am glad that we did the extra work and put the third coat on.


Tonight we finally get to put our furniture back! Mr. B did hook up the TV in our room, so the past few nights we've had movie nights in bed. It's a nice treat but I'm ready for things to go back to normal.


Tuesday, March 12, 2013

Floor Refinish

Before we even moved into the house we tore up all the carpeting in the down stairs. The old shag carpet that was well worn. Well past it's prime. So past it's prime there were definite worn areas from the previous owners paths around their furniture. Like the carpeting upstairs it had a distinct odor of cats and old people. When we tore it up the floor underneath was the four inch pine boards. We decided then and there that we were going to try and have them refinished rather than cover them up. We knew that they would be beautiful when finished, or at least that's what we kept telling ourselves. The boards were unfinished and dirty and scratched and there were gouges and imperfections, not to mention the two foot border of paint around the edge of each room. Did you know that back in the day people would paint the edges of the floor and put a large area rug in the middle of the room. I think I told you that before. We have lived with unfinished floors for over two years now. 


We kept going back and forth. Do we try it ourselves or do we shell out the money for someone to do it for us. Back and forth for two years. Then we thought let's try it in one room and see how it goes. We would try it in what is going to be the office and crafty room, perfect area for our expirament, if it didn't go well it wasn't a common space like the dining room or living room. We kept he-hawing around as to when we would give it a go. I made an executive decision. I took last Friday off put on my big  girl pants and rented the sanders. I recruited Mr. B's brother for a pair of extra hands. No turning back. 


We sanded for most of the day on Friday. I do mean we this time. I helped, pushing the big drum sander back and forth across the floor to smooth them out and remove some of the blemishes. It was like mowing the lawn, back and forth back and forth, slow and steady in nice straight lines. Another day of applying the polyurethane  Well two days. We put two coats on let them dry, and they weren't smooth. The next day I buzzed over the floor with 220, really fine, sand paper on the orbital sander and we put a third coat on. Perfection this time. 

Come, let me show you how it looks now.


Side note: Mr. B and I used this room as our bedroom for two years while we waited to work on the master suite. It never had a door. We never put one on. For the life of me I don't know why. We bought one this weekend and Mr. B had it installed in an hour. It took me a few more to get it painted. What were we thinking. All those fights were I just wanted to run to the room and slam the door in anger. Those days where people came to the house and could see into our room. Really, could we have been that stupid!

Let's not dwell on that. We are not here to figure out the logic in our thinking, but to admire our handy work. 


Look at that beautiful floor. 

We couldn't be happier with the way it turned out. There are still some imperfections and stains in the wood. You can see where they are nailed down, in one place some one went a tad over board with the nails; must have been a squeekie floor board. The weathered look adds to the farmhouse feel we were going for.

It was alot of work but well worth it. And we saved a chunk of change doing it. We are so happy with our refinishing abilities I have already taken another Friday off at the end of the month for us to do the other two rooms.  

One more look. Let's do a side by side comparison. 


Tuesday, October 16, 2012

How to Paint a Wood Floor

I have been painting the wood floors here at the acres. We decided to go with paint for several reasons. It brightens the room. It is easy to clean, the Gus bunnies gather into the corners and are easy to ketch with the vacuum and is easy to scrub and wipe up. Unlike carpeting it doesn't hold smells and doesn't stain easily. If it starts to look dingy simply repaint. We also feel that it stays true to the farmhouse look that we are going for. When we tore up the carpet there was already paint on the floor. People used to paint the edges of the floor and put a rug in the middle. Look in some of your trendy furniture catalogs, you will notice painted floors. Thanks mom for pointing that out! (she was hesitant two years ago when I told her my plan, she has since converted)

So how does one go about painting a floor? It isn't that hard. I'm sure there are several ways to go about doing it. This is just how we do it around here and what works for us.

First you need to make sure your floor is clean. You don't want to skimp on the prep work. Like any project it will make for a better finished product. Tap down any nails and pull up any staples. Sand the really rough spots and as it was in our case any glue off the floor.  Vacuum up all the dust and then wipe down the floor to get any dirt and dust that remains. You don't want your roller picking any of that up. We have five inch pine boards for flooring, so before we vacuumed we took a screw driver and scrapped the 100 years of dust and dirt that was packed in the cracks between them.

We end up with something like this.


Now that the floor is clean it's time to prime. I am a strong believer in priming. We have found that it works best to use an oil based primer, I like Zinsser 123 oil based. Oil based is the best at sealing the wood and locking in stains. We tried water based on one of our floors and had some stains bleed through. It looked like I split coffee all over the floor. We went over it again with oil based no stains came through with that. After that mishap we have used oil base and haven't had anything bleed through with one. 


As with painting any wall I edge it in with a paintbrush. I go along the baseboard with an angled brush and pull the paint in towards the center a few inches. Mr. B use a roller to paint the rest. (That's team work) Let the primer dry for at least three hours, overnight is the best. 

Then it's time to paint. Use a paint that is made specifically for floors. You don't want to use regular old wall paint. You will be walking on this, and you want to use something that will hold up to the heavy traffic and beating that a floor takes. I like Behr porch and floor paint. The friendly people and your paint store should be able to tint it to whatever color you like. I use a shade of whit on all my floors. I have also used a dark brown on my stair.


Just like the primer edge in around the baseboard with a paint brush and use a roller on the rest. You will want to do at least two coats. Remember you will be walking on this. You might need more depending on the color you use. I think I did three or four coats on the stairs with the dark brown. So when you are done you end up with something looking like this.


Some people put a coat of varnish on top of the paint. I opted out of this. I think it would make the floor to shinny(slippery) and it would show the scratch marks from someone's claws. 
(Mr. Gus) Like I said if it starts to look nasty and beat up, we can always freshen it up with a new coat. Our bathroom has been painted for two years, and we haven't had to do that yet. 

To recap you prep by sanding problem areas and give your floor a good cleaning. Give it one coat of oil base primer and two coats of paint. The whole process will take a weekend. After doing four rooms my only regret it that I wish I would have invested in a pair of knee pads.